Followers

Tuesday, 24 November 2009

C.G modeling- Ponch

I was excited to start modeling my characters. I had previously drawn turnaround poses so that i could model from a front and profile view. This is generally considered an easy alternative to creating small maquettes of my characters however in most cases the desired effect of the model is rarely achieved in the drawing and in my case i felt as though I was tweaking the design of my character when modeling in the Maya software to get the desired look. In industry, the larger 3D studios such as Dreamworks and Pixar have a large collection of actual 3D clay models and drawings for the C.G modellers to ork from, in some recent cases C.G models have been created by scanning a maquette into a computer however the polygon number is extremely high making the C.G software run at a much slower rate. I have had quite little experience modelling characters. Last year I had to model three squire characters that all looked quite similar, none of the models were particularly complicated and I didn't have to think about facial or body topology which when building my Ponch and Chique characters I most definitely would. Facial topology is essential when modelling for animation. It allows the rigger to easily control the movement in the characters eyes, nose and mouth and create expressions that can later be controlled as blend shapes. I had no previous experience with topology and struggled for a while to grasp it. I searched the web for images or diagrams that would better explain to me what facial and body topology looked like. After finding some very useful images I began rebuilding my characters face round a shape that I had created that resembled the basic shape of Ponch's Head. I started by extruding the faces around the left eye of the character. I then began inserting edge loops so that I could achieve some good topology and decent eye deformation when creating my blend-shapes for the character. After i created a decent enough eye i then duplicated it with an 'instance' special attribute that would mirror what ever I done on one eye to the other so that i would have a perfectly symmetrical face. In my case my characters are both quite simple so symmetry works well in however in most other cases it is better to make some slight alterations to each side of the characters face so that they appear more realistic. This can be done by altering the topology or vertices's on the face in Maya or later when creating Normal/ Diffuse/ Bump maps in Mud Box. If I have enough time I would like to add some minor bits of detail to the model of Ponch especially on his hands and clothes where creases in the cloth and skin will be needed.
After modelling the eyes I had grasped creating facial topology so creating the mouth and nose wasn't too difficult. I joined the faces together creating Ponch's face and head. Unfortunately i had been concentrating too much on getting the topology correct that i had ignored the exact shape of the Characters head. When i smoothed the model there were wrinkles and dents in the face from where the edges were too close together. I began fiddling with the position of the vertices's, it became very frustrating and time consuming. I experimented with creating the basic shape of the head and clicking the make live command which meant i could drag out my vertices's to snap into place creating the correct shape for the characters head however I wanted to move the vertices's in one axis but couldn't so it made positioning them very difficult. Eventually i discovered a tool that i had forgotten about, the 'smooth' brush and 'pull' brush. By playing around with these handy tools i was able to get the perfect head shape for Ponch.
After I had completed the Face the Body wasn't to difficult. I needed to make the body quite simple anyway so that the n cloth 'poncho' would react well to it. The upper body and lower body are separated by a pair of pants so i didn't have to worry too much about joining the topology between the two. It is important to consider how you want the character to move. I added edge loops round the places on the body that are most likely to bend e.g shoulders, fingers, elbows this would hopefully make painting weights easier in the rigging stage.

The images are examples of Maquettes used by studios and example diagrams of facial topology.


Thursday, 12 November 2009

animatic

After spending a long time perfecting the story of my production I began designing a storyboard. I wanted to use a variety of shots. Because of the scale of a festival to minimise modelling too many background elements I decided to use quick close up shots to emphasise the comedy. When putting together the animatic I carefully timed the shots to what i thought would give perfect amount of animation time combined with the comedic effect of the shot. Producing the animatic gave me the opportunity to play with sound a see how sound could be used to create comedy effect.

Pitch major project

Pitching my idea to a panel gave me professional experience for the future. I used my wow image and photographs taken for research to create a short video with high impact. The panel made it clear it was important that the relationship between the two characters must be obvious for the audience to engage with them.

Tuesday, 3 November 2009

Character Design, Concept Art


A design Bible and good portfolio are the key to getting an idea off the ground and noticed by studios. I felt it was important that I had neat copies of character designs and poses as well as concept art. Concept art would be key in pre production stage of the animation. The colour scheme, style and mood of the piece should be reflected through the concept art. Although my production will be in 3D I painted concept pieces and character designs in Photoshop. I plan to then build my 3D models from the initial drawings and measured turnarounds. Because of the festival theme I decided to focus on a greenish colour scheme with exception to novelty festival props and lights from the stage. I watched the Pearce Sisters animation and really liked the green colour scheme they had decided on for the characters and inside their home. Ideally would of liked to produce an animation using a similar technique to the Pearce sisters, a mixture of 3D animation with painted frames giving it a 2.5 Dimensional look.

click link to watch The Pearce Sisters

Tuesday, 20 October 2009

3rd year Major Project: Initial Ideas/ Characters

At the end of the second year I presented a below average idea to a panel. I understood that the storyline was a bit depressing.I felt that the symbol of death following human beings caught up in the drug culture was a bit cleshai and the panel believed that the script was weak and needed to be changed. Instead of tweaking this idea I completely changed my story and characters and decided to take a more comedy approach to my third year major project.
My interest in music festival and the festival lifestyle drove me to create an animation based on two characters experience at the beginning of a festival. I originally wanted to focus on the two characters struggling to build their tent, this way I could get humour out of the accidents that occur and misfortune of the characters. The animation is going to be around 90seconds long aimed at being shown as a short to promote the broadcasting of a music festival on a certain television channel. From previous work I feel it would benefit me most by creating the animation in 3D. Certainly the characters would be modelled, rigged and animated in the Maya software but considering the scale of the project I have began to consider using 2dimensional backgrounds and using depth of field and effects in a comping package to create the illusion of a 3D background. Props and foreground elements will be created in Maya but to avoid waisting time i will seek the help of modellers from the second year to create different tents.
When designing the characters I wanted to get across that one of them was a regular festival goer while the other one was having his first festival experience. The relationship between the two character is comparable to that of laurel and hardy. With one who believes he is superior but annoys the other character who could be considered the more sensible of the two however is hindered by his friend. I need to consider the characteristics of the characters so that the 'comedy duo' effect is successfully achieved otherwise the characterisation will fall apart and the relationship between the two characters wont be clear resulting in the story failing to provide any comedy at all. After watching some Pixar shorts I realised that the audience needs to feel some sort of empathy with the characters so that they can relate and be taking on a emotional roller coaster throughout the animation, drawing the audience into the piece.

Saturday, 30 May 2009

Developing Ideas for 3rd Year


I am looking forward to working on my project next year. This year has taught me the importance of time management and organisation. A group production would mean that my third year project could be longer and more detailed however from experience it is apparent that group work is more difficult to organise and unfair when work load is distributed. I hope that next year the motivation to get the animation complete will spread across the whole group rather than individuals working harder than others. This means that if I were to work in a group the idea and workload would have to keep the whole team happy throughout the course of the year to minimise stress and build a friendly team environment.
I have recently started developing ideas. I originally wanted to produce a controversial artistic piece of animation that would hopefully get noticed nationally for its explicit content and underlining meanings but I have no narrative, character or ideas to represent. I began looking towards what I already knew and thought about the characters in the real world, researching social groups and music. Eventually I ended up focusing on locations like Brighton, Bristol and Camden. I started developing my original first year character 'Bobo da ASBO' t5o use as maybe one of the characters in my third year animation. I hope to be able to work with mixing live action and Computer animation and create a something similar in controversy and graffiti style to Ralph Bakshis 'Heavy Traffic' and 'Coonskin'.

Tuesday, 12 May 2009

Knights Project: Lighting, Rendering, Comping

When the animation was complete the C.G team had to focus on lighting the shots. Originally we were going to use the mental ray sky feature to light are scenes because it would avoid problems when matching the lighting in the 2-D backgrounds to the 3-D animation but there were problems with the shadows and it would be bad practice to use the feature. Instead I carefully placed directional lights with different intensities into the scene and created good lighting and shadows based on the light direction in the storyboard. When Rendering I needed to create layers that included the lighting on the models (beauty) and the shadows created by other models (shadows). Because the 3D is being placed on top of 2-D it was important to render out shadows on objects that wouldn't render out for example the floor. The software renders out the shadows and beauty separately so that they can be edited in comping.
I originally wasn't expecting to do any compositing but I couldn't resist completing the shots I had created. The Art Director ( Justin) wanted the shadows to be less harsh because although the lighting looked good the shadows suggested the wrong time of day needed for the shots. Finally shots were being finished so we dropped them into the block through so at least the team had evidence of our work.

Knights Project: Problems with Rendering

Like most animation productions there are always technical problems especially when working in 3D. The team struggled after the textures were applied to the models. Firstly we had to make some U.V adjustments so that the textures looked right. Then create maps so that when the models were re-referenced into our animated shots the textured models would be animated and able to render. It took the team a while to get the textures correct but eventually we solved the problem however more problems came soon after. When creating the models I hadn't run a practice smooth render to see what they would look like in a rendered scene. The Squire models head and can style suits wouldn't render out in the mental ray settings. The team and I couldn't work out why and ultimately lost a lot of time trying to solve the problem. It turned out that some of my geometry on the squires head hat and can was wrong and wouldn't render. The simple solution would be to go into the original file and cleanup the model mesh which worked for the Red Squires can but changed the model slightly meaning that i had to make some quick adjustments so it looked like the original model. The Blue Squire was harder to solve but eventually we realized that the connection of the ear to the head was causing the problem. By changing the geometry on the head the team feared that we would loose the blend shapes which would have meant that i would have to re-create all the blend shapes for the model. Luckily the blend-shapes were not lost but some of the blend shape animation in one of my scenes vanished when I re-referenced my Red Squire character. I solved this problem by referencing another model into the scene and turning its visibility on and off when I need facial expressions. This was extremely annoying when the team thought we were getting close to the end of the project but it cost us heavily and we wouldn't make the deadline. The silver-lining though was that I feel I have learnt much more about dealing with technical problems and for my next production will leave much more contingency time for problems such as this.

Knights Project: Animation

To help with organization the team numbered the shots on the story board, making changes to the shot order after closely analysing the block through and animatic and realizing the continuity was lost in certain shots. The animation was split between three team members. We replaced the models in the Block-through scenes with the rigged and ready for animation models. Although I wanted to animate more scenes that included the knight characters it would be much more beneficial for the team if I concentrated on animating shots that included my squire characters because I am very familiar with the models rig and animation capabilities. Of course most of the shots included two characters and my responsibility was to complete the animation for the opening scenes where the Red Squire character is putting together the knights armor. I also had to animate both the squires running to there coloured tents. I needed the Blue squire to be slightly different in character to the Red Squire so i decided in making is the character more clumsy and the whole team would have to incorporate this into the animation of the Blue Squire. I created run cycles for both characters, usually I wouldn't do this when animating a run but because we weren't using 3D backgrounds or floors it wouldn't make a difference to the animation in the final comp. Because of the cylindrical shape of the squires they waddle which adds humour to the scenes. I included the Blue squire tripping over and rolling down the hill to add to his clumsy character. The characters have to pick up objects and move them around. In an animation i had done using the Andy rig I had worked with parent constraint animation but during the project learned that it is always best to parent and object to a joint on the body (in this case the hand) and animate the movement in the object as opposed to animating the characters hand. this was good information to have considering that are sketch is based around a sword fight. I also learnt that in many studios when animating high action shots they leave the leg animation till the end but because my legs were separate from the body i animated them at the same time. This was one of the most rewarding tasks, finally being able to see my models come to life. I enjoyed using my blend shapes to get across emotion through the expression in my characters. When animating it is important to refer to the play-blasts just to check that the timing is correct. This has been the most enjoyable part the project mainly because it requires little technical knowledge of Maya and is more about the skill of animation.

Monday, 4 May 2009

Knights Project: Blendshapes

This whole enormous rigging process continued. This is by far though a more exciting part of the process creating blend shapes and assigning them to my squire characters. Blend shapes work by duplicating a piece of geometry e.g. a head and altering the shape. My blend shapes didn't work if any geometry is added or taken away. The soft modification tool in Maya means that the object is treated almost like a piece of clay and moves the edges and vertices to my desired look. In the latest version of Maya they have included a soft selection tool that makes altering the vertices on an object much easier. For facial expressions it is important that there is a blend shape for each half of the head for example instead of creating a blend shape that had both eyebrows up it is much better for the animator if two separate blend shapes are created, one with the left eyebrow up the other with the right eyebrow up, this gives the animator more control. Mouth shapes for lip-synching are done this way. My characters however have no real dialogue therefore I didn't have to worry about getting the correct shapes for certain letters. I mainly concentrated on the emotions in the eyebrows for my red and blue squire characters. For my green squire character I created basic mouth movements that could suggest emotions like happiness, sadness and concern. The character also need to be able to blow a trumpet in one of the shots therefore I created an appropriate blend shape. After the blend shapes have been created and assigned to an object they appear as animation sliders in the blend shape editor, this was originally where all the animation was done until animators developed controllers that an animator could use on the screen next to the character to make it neater and simpler. This process of creating controls is very complicated and due to my time restriction and lack of blend shapes my team decided it would be best to use the traditional slider method.

Knights Project: Rigging Controls


After creating the skeleton for the rig and binding the skin you have to create controls that make the character move. Its always best to keep a clean looking hierarchy at the side of the interface by parenting certain geometry and joints to controls also makes an animators job a lot easier. My characters have I.K handles and pole vector constraints that control the movement in the arms and legs and angle of rotation in the knees and elbows. The upper body including the arms, head and helmets of the squire character are controlled by C.V curves and work on the rotation. The larger circular curve controls all the upper body including the rotation in the arms, it doesn't control the arms individually but if the top of the character moves forward or rotates then the arms simply move with it. I have separate controls for the head and helmets. I used aim constraints to controllers for each eye and parented it to a controller that controlled the movement of both eyes. For things such as ankle rotations, foot movements, finger rolls, wrist and hand movement’s controls need to be added via the hypershader. I selected controls that move the o.k. handles for my arms, I then added attributes to the control such as "wrist roll" and "index roll" and made sure that all my hand and wrist movements were named properly so that the animator could easily understand how to animate my model. I assigned each individual joint to an attribute using the hyper shade making sure that each rotation was correct. This means that instead of having a control for each finger bend the Hand control can be selected and the attributes appear on the side of the screen, the animator just selects the movement i.e. 'index finger roll' and slides the cursor across the screen making the joint rotate in either x, y or z depending on what rotation it was assigned to. The same process took place when including the ankle and foot controls in the Foot I.K handle control. Although this seemed to be a daunting slightly complicated task it wasn't and I actually found it quite therapeutic as no problems occurred and the process was quite repetitive.

Knights Project: Painting Weights

My lack of experience rigging characters in Maya meant that I hadn't taken into consideration the time it would take to fully complete. The rigging process has taken so far the longest. Although I was taught the basics of rigging in a short tutorial I hadn't heard about painting weights and didn't realize the potential difficulties that could arise when finalizing a decent rig. Unfortunately this process took much longer than anticipated and the timetable was completely ruined. Because I wasn't totally comfortable with the whole rigging process and painting weights I constantly had to go back and alter the rig and play around with the controls. It took me nearly a whole day to figure out how to paint weights properly so I retraced my steps and re-painted the weights on each model. I also struggled with creating controls that functioned properly which meant that with all these problems I had lost nearly two whole weeks and started to cut into my animating time enormously.
The idea behind painting weights is to make sure that each individual joint in the characters rig moves the right part of the body and the skin correctly. After creating a rig and binding smooth skin the model can move but sometimes certain joints move different parts of the body that shouldn't be moving. The bind skin tool does work quite well but painting the weights correctly means that the rigger can achieve correct looking creases in the skin when for example the fingers roll and the knees bend. The trick with painting weights is to replace the weight first before adding weight this makes the process a little bit easier to control. I prefer working in the black and white mode. Black means that the skin will not react when the joint is moved or rotated white means that it is highly reactive to the joint. Between these two colors are plenty of shades of grey that will react slightly more to the joint the whiter the skin is. To prevent horrible looking creases in the skin it is best to paint the areas that will react totally white and other areas totally black then smooth the weights using the smooth/ flood buttons This blends the black into the white creating different grades of grey shaded skin. If a rigger would prefer he also has the possibility to work in multi-color mode but I found this more difficult to distinguish where my weight painting was going wrong. The most challenging thing about this task was the finger. I had to redo the fingers for all the squire characters at least three times because I couldn't get my head around how to paint them correctly. Eventually the models were painted. I will always dread this part of the Maya character building process but now that I have practiced o should find it a lot less time consuming in my third year. Online tutorials that I have recently seen show more how to paint weights with my knowledge already combined with hopefully more teaching and online tutorials should mean that it wont take me this long in my third year projects where I hope my characters and rigs maybe a little bit more complicated. I have included a link to a You Tube video that quickly shows the weight painting process.

Painting weights

Monday, 20 April 2009

Knights Project: Rigging the Characters


For this project knew that Rigging would be the most challenging task. So far it had proven to be. Because of my lack of experience I found the task very difficult however I was learning new things everyday that are necessary if I want to make my own 3D productions in the future. Building the skeleton for the Squire characters wasn't difficult and didn't take too long. I was particularly impressed with the Maya Bind Skin tools and enjoyed seeing my characters start to come to life. I.K handles make the movement of the arms and legs easier to control. The movement of the characters wrist, hands and fingers is controlled by attributes added to a Control Node. Adding controls isn't necessary but makes the animation of the characters less complicated. All the I.K handles have controls so that arm and leg movement is easily dealt with, for more intricate movement such as the twist in the ankle and ball of the foot rotations are controlled by clicking on the controls for the leg and arms and altering the attributes. After making sure the skeleton and skin move correctly, weights need to be applied to the model so that when the arm bends it looks completely correct and doesn't twist and deform the skin. This tedious process is called 'painting weights' and I found it very difficult to understand, often having to restart from making such a horrible mess of the model the first time round. Eventually i began getting more comfortable with the tools however time is running out so I have done the best i could in the short space of time mainly making sure the major weights were painted like on the fingers, knees and elbows. The Squires head, hat and suit are relatively easy to control because of their basic separate shapes I have parented them to circular C.V curve controls that work on rotation. This part of the production hasn't been particularly enjoyable mainly because its the part just before the animation which is the best part. After doing this I have realized that i need to keep practicing these new Maya techniques so that i can become quicker at my work making me more suitable to work in a 3D studio environment.
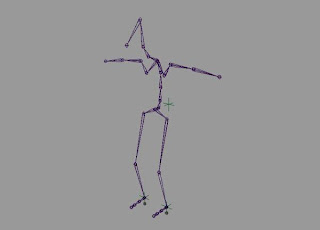
Below is an example of a standard Maya skeleton for a human rig.

Saturday, 28 March 2009

Knights Project: Character Modelling/ Development of Character design in 3D


One of my main objectives for this term was to improve my Maya knowledge and modelling skills. This is partly why I wanted to involve myself in a 3D production for the Talking Dog project. My responsibilities within the 3D department is to build the models of the knights squires, rig the characters so they are able to move, build any props or extra models for the production, animate a selection of all the models, U.V un-mapping and helping with texturing in the 2D department. A challenging task that if completed well will have taught me more about Maya and the pipeline of a 3D production.
The Exeter Ident project I produced last year taught me to be a lot more organised. Pete took on the role of producer. Instantly the 3D department worked out a computer filing system that could be easily followed so that the team didn’t struggle finding files. Project folders for every model and referencing the animation were things that I hadn’t done before in the previous Ident project but now I realise that a short amount of time organising saves a lot of time in the production. Improving my organization skills was another goal for this term, time management is crucial with dealing with this project and any time that can be saved is vital.
Tony designed the Squire characters in Photoshop and gave me the ‘turn-around’ files to build my models from. The team decided that because of the amount of time we had that all the 3D Squires should look similar with subtle differences to save time, meaning that the personality differences would have to be obvious in the animation. The original drawings were quite difficult to work from because they were to simple resulting in the models looking quite dull and very similar. Changes were made to the body of the squires. Now each individual squire would be wearing a certain type of cylindrical object for example; the red squire is now wearing an old soup tin and a colander on his head, the blue squire is wearing an American style trash-can with a pot on his head and the green squire wears a beer can and a dustbin lid on his head. The original designs were to plain, this way the characters have more comedic value. When I first completed the Squires they didn’t look as I had hoped and actually looked quite evil. I wasn’t sure why though so I imported an image of the face into Photoshop and using the warp tool and paint brush moved the face around and added features that would make the squires look a bit for friendlier. I referred to some online tutorials when modelling difficult elements like the ears and face loops. It was my first time modelling a face and I wanted to do it using planes so that next year I could model quite complicated characters. Overall I was very happy with the finished models.

Sunday, 8 March 2009

Talking Dog: Knights Sketch.

The BBC have sent comedy sketch scripts to several animation courses across the country asking students to produce a professional animation to suit the script. Comedy sketches are all about timing, it’s about mixing the mundane with the fantastic. If the animation is too busy or the timing is wrong the comedy could be lost completely.
Out of all the sketches my favorite ones included the Strat-equette sketch, a sketch based around health and safety in a Middle Eastern torture facility. The casual approach to torture and political incorrectness of the sketch is what I liked about it. Another one of the sketches I enjoyed reading was the jordi fly. I imagined a really British humor style sketch that mirrored the ridiculous comedic style of the Mighty Boosh. The sketch I chose was the Three Knights sketch. The reason I chose this was because it included no real dialogue just sounds and grunts. It seemed the best sketch to produce because the comedy would be in the animation not the dialogue. In the sketch the knights fight each other. The prospect of animating a fight sequence that included some degree of comedy is what attracted me to work on this project.
The team I’m working with consists of six members all split into different areas of production. The Pre-production team responsibilities includes deciding on a color palette to work with through out the whole production, character design for all three knights armor, knights bodies and squires, background design, storyboard, animatic, and prop design. The producer and art-director decide on the final designs and hand them over to the production team. The Production is a mixture of 2-D backgrounds and C.G.I animation and characters. The production team is responsible for building all the characters and props in Maya, Rigging the characters and Animating the sketch. The models need to be textured the whole team will have to work together to set the UV in Maya and a 2D designer will work on the textures. Post-production includes comping the two styles of animation together and editing the sequence to have a comedic effect. The Sound will be animated to in production but will need to be carefully edited and synched in post-production. I have assumed the role of C.G.I animator and modeler, my responsibilities are to model, rig and animate the knights squire characters, model props such as amour and swords. I have also taken the role of assistant producer helping to keep all the work files organized and have input during production meetings.
This will probably be the most challenging brief I have worked on complete. The project will force me to learn more and improve my modeling and animation skills in Maya.

Maya MEL (Maya Embedded Language) scripting

Computer scripting interested me but I never thought I would enjoy learning about it or even doing it. Learning the terminologies and "computer language" is extremely useful when working in a studio environment. By understanding more about the software an animator is able to communicate with a computer programmer making the possibilities endless. Computer programmers will create new tools for the animator that will speed up production time, the most important thing in a busy work environment. The sessions have taught me the basics of computer scripting and the first step tutorial was really useful. The Maya help site explains all the sintex code. The box that holds all the previous commends is extremely useful because when when a logic or sintex error occurs the programmer can seek it out in the history. I now know how to create a button in Maya and realised that anything could be scripted so theoretically a whole animation production could be created using MEL in Maya.

Wednesday, 4 March 2009

Editing Task

I had already been editing for the Animated Exeter ident last term but made the mistake of using After Effects. This time i would be familiarising myself with Premiere. I hadn't used it for editing before just compiling together simple animatics. I had previously used a simple windows movie maker program to edit a short trailer I put together in my high school days but it wasn't as advanced as Premiere. For this editing task we were asks to mash up to film trailers to create a new trailer that would reflect a different vibe to the original film. I decided on mashing together Toy story and the terminator after seeing The Dark Knight/ Toy Story mash-up online.
It also seemed the most relevant seeing as I'm studying animation. I hoped to be able to produce a finished trailer that matches the standard of the one in the link.
toy story mash up dark knight

Scriptwriting Workshop

Over the last two weeks i have been going to scriptwriting workshops to understand more about how to write a decent script. I have had some experience writing scripts before but the session helped to refresh my memory and taught me some new things about the format and layout of the script. I had know knowledge of the three main stages of storytelling: Set up, Confrontation and Resolution. By reading illustrated kids books I strangely was able to understand this. There are seven main plots to any script or story these are: Comedy, Tragedy, The Quest, Overcoming the monster, Rags to riches, Voyage in return and Rebirth. Examples of these include Lord of the rings (quest), Titanic (tragedy), Beowolf (overcoming the monster), Dick Whittington (Rags to riches, Wizard of Oz (voyage in return) and the Snow queen is a good example of a rebirth story. Scriptwriting is one of my favourite parts of pre-production and is really the starting block for films and television shows. I look forward to generating ideas and ultimately creating a full script for my 3rd year projects.

Wednesday, 18 February 2009

Story- boarding: "Blackbird"

I was really interested in producing a storyboard for a music video it was an ideal project for me. I had enjoyed producing storyboards before but had only drawn them for film direction and shots. Coming up with a pitch style storyboard would mean that I would need to take a more artistic approach and consider the style of animation and reflect this in the storyboard design. I decided to base my storyboard on the Beatles song Blackbird and build a story around the interpretation of the lyrics. People believe that the song was about the Black civil rights movement and the Riots in the Sixties. My story was based around a Black bird characters journey through time from the 60s to the recent election of President Obama. I used symbolic characters such as Black panthers and American bald eagles as well as strong Propaganda poster style graphics for the Background. I want the actual animation to be done in a POP art style similar to the comic book style of pop artist Roy Lichtenstein this way the storyboard can be easily red and the American theme can be represented. The finished storyboard was mounted on black card but I want to digitally edit the storyboard to give it a more professional look. This is an example of the animatic along side the song:

Thursday, 12 February 2009

Character animation

The most important part of this assignment is to consider the principles of animation: Timing, Exaggeration, Silhouette Technique, Stretch and Squash and Anticipation. The Character needed to reflect personality and show a process of thought and react accordingly through use of Body Language. I decided to produce an animation in Maya. I hadn't before animated a human character in Maya before and had only really experimented with the Sac rig. The first week I spent practicing moving the Andy Rig around so I could get used to animating in 3-D. I hadn't used lip synching or face movement tools before and it was really interesting experimenting with different facial expressions. Before I got anywhere near animating the character a needed to listen to the dialogue we were given and understand how a person would move when saying "aaaaaah, maybe I should quit and go back to making noodles". The best way to do this was to film myself acting out the scene and watch it back. I filmed myself 3 times and carefully watched how I moved. I saved certain key frames and practiced drawing them out in stick men poses so I could gain a better understanding of the positioning of the body. I took the saved still frames and compiled them together to create a rough outline of how I wanted the character to move. After listening to the sound I had to break it down phonetically to write it on the Dope sheet. This would help me with timing in when I was doing the lip sync. I also drew thumbnail sketches of my body positions alongside the dope sheet so I knew what frame the pose started and ended at. The dialogue was short and I hadn't spent any time on character design so I wanted my Andy rigs surroundings to set the scene and begin a story. I built a small mini golf green for the character to play on he misses a putt and then say the dialogue. It was important to me that the golf swing was correct as well as including all the vital anticipation and exaggeration needed in the body movements to get across the characters emotions as the golf ball approaches the hole and misses it. By editing the timeline play back "stepped" animation I was able to concentrate on creating accurate poses and change and tweak the timing. When I was happy with the timing I watched the animation back in real time and made changes so that it flowed better with no mistakes. Unfortunately whilst animating I think I may of concentrated more on the poses being correct as opposed to the timing of the whole piece because after some constructive criticism I realised that the animation was a bit too rhythmic which took the attention away from the body language of the character therefore losing the emotion and thought process of the character. Each pose almost falls on every second I need to hold some poses for longer and edited the movements so the animation can really come to life.